

Raspberry Pi 5 Not Booting? Power Supply Rise Time Matters
Introduction
While working on a recent Raspberry Pi 5 project we came across a slightly unusual problem.
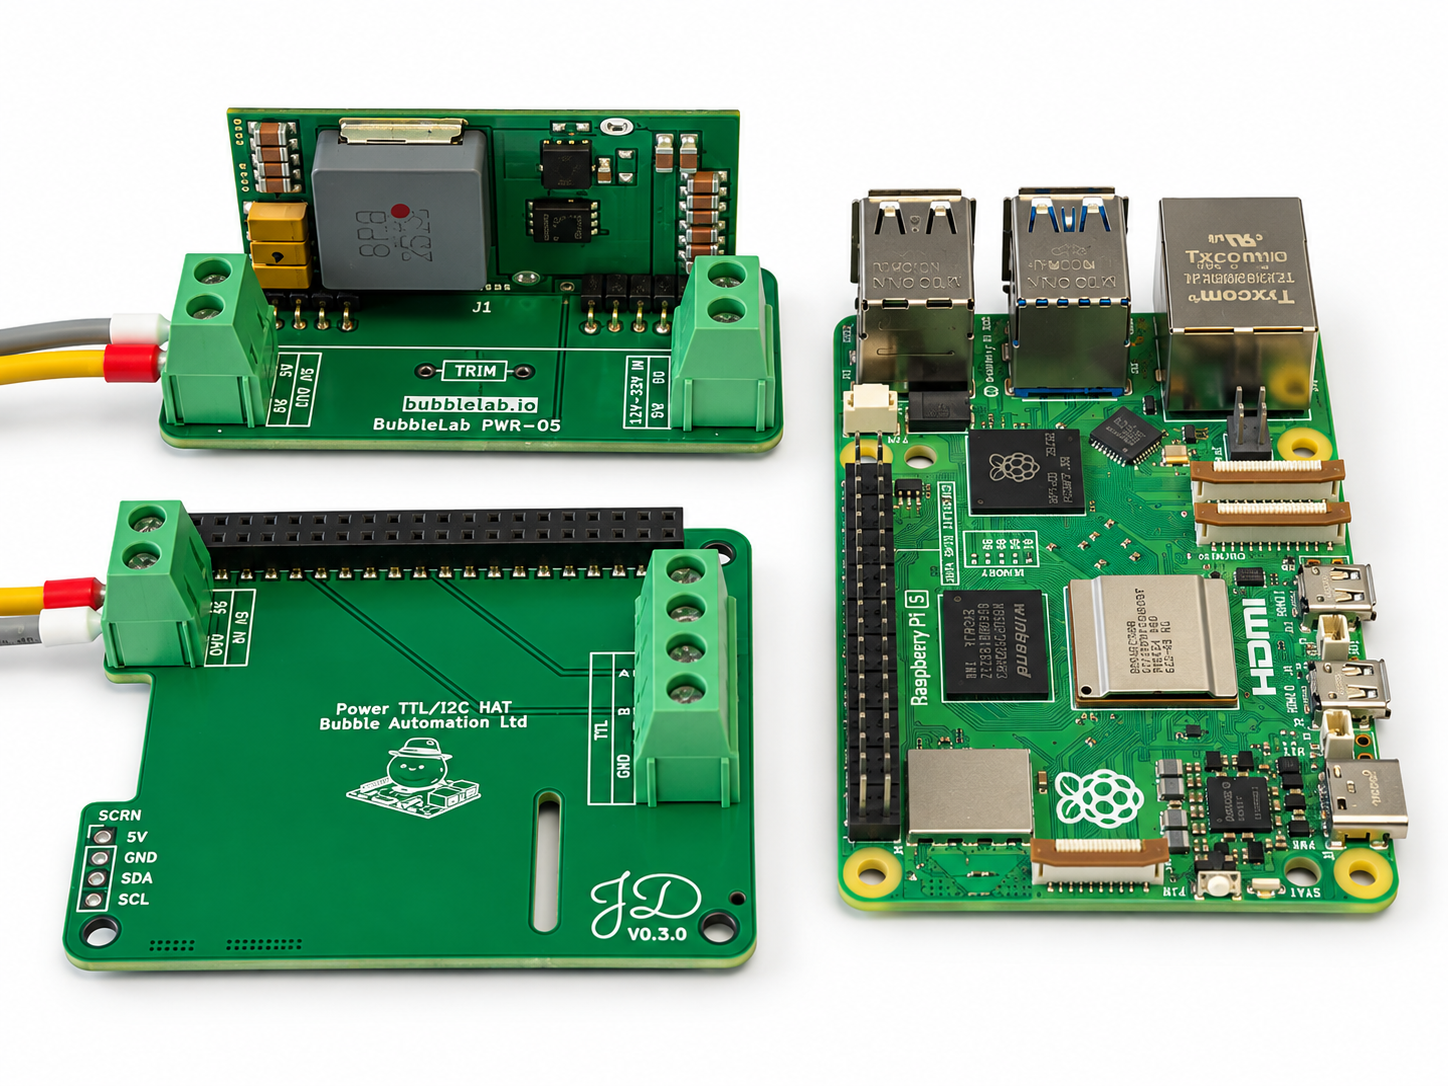
We needed to power a Raspberry Pi 5, touchscreen and some additional hardware from a 24 V DC supply. Rather than using a mains USB-C adapter, the obvious solution was to use a reasonably powerful 24 V to 5 V DC/DC converter and feed the Raspberry Pi directly through its 5 V GPIO pins.
For this we selected the Mean Well NID65-5.
The NID65-5 is inexpensive, compact and provides up to 6.5 A at 5 V, making it almost ideal for powering a Raspberry Pi installation.
However, we started seeing a strange problem.
Every time power was applied via the GPIO the Raspberry Pi simply wouldn't boot.
The 5 V supply was present, there was plenty of available current and pressing the Raspberry Pi's power button immediately brought it to life.
After quite a lot of testing, it turned out the problem wasn't how much power the supply could provide.
It was how quickly it provided it.
The Raspberry Pi 5 Power-Up Problem
The Raspberry Pi 5 uses its onboard power management circuitry to monitor the incoming 5 V supply during startup.
When powering through the normal USB-C connector there is additional protection circuitry between the USB-C input and the Raspberry Pi's internal 5 V rail.
When powering directly through the GPIO header, this circuitry is bypassed.
This makes the behaviour during power-up slightly different.
Raspberry Pi engineers have explained that there is a particularly important period while the incoming supply rises from approximately 3.5 V to 4.1 V.
If the supply rises too slowly through this region, the PMIC can detect an undervoltage condition and place the Raspberry Pi into STANDBY rather than continuing to boot.
This explains the slightly confusing behaviour we were seeing.
The Raspberry Pi wasn't crashing because the power supply was too small.
It was deciding not to boot before the power supply had even finished starting.
Measuring the NID65-5
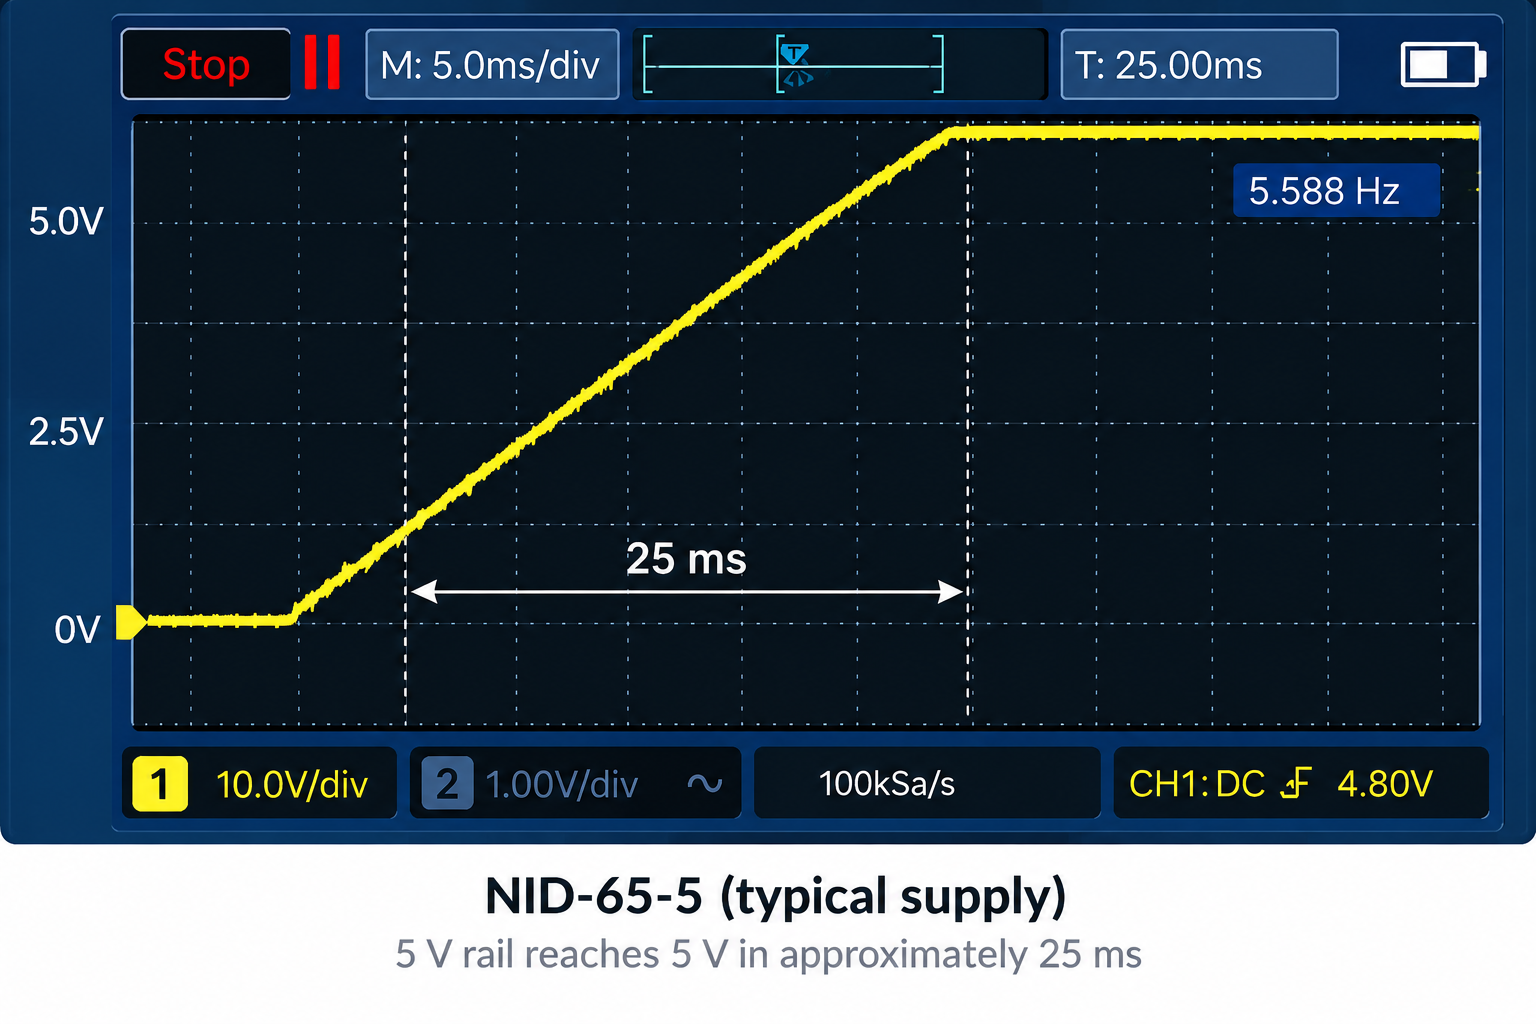
Connecting an oscilloscope to the NID65-5 output made the problem much easier to see.
Rather than instantly producing 5 V, the NID65 has a relatively gentle startup ramp.
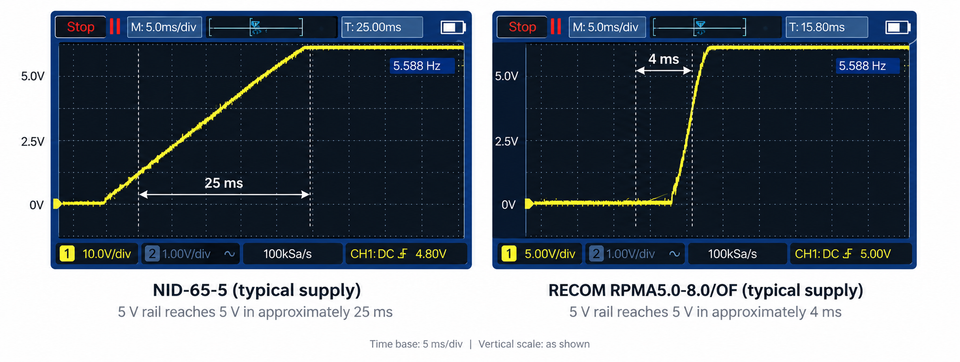
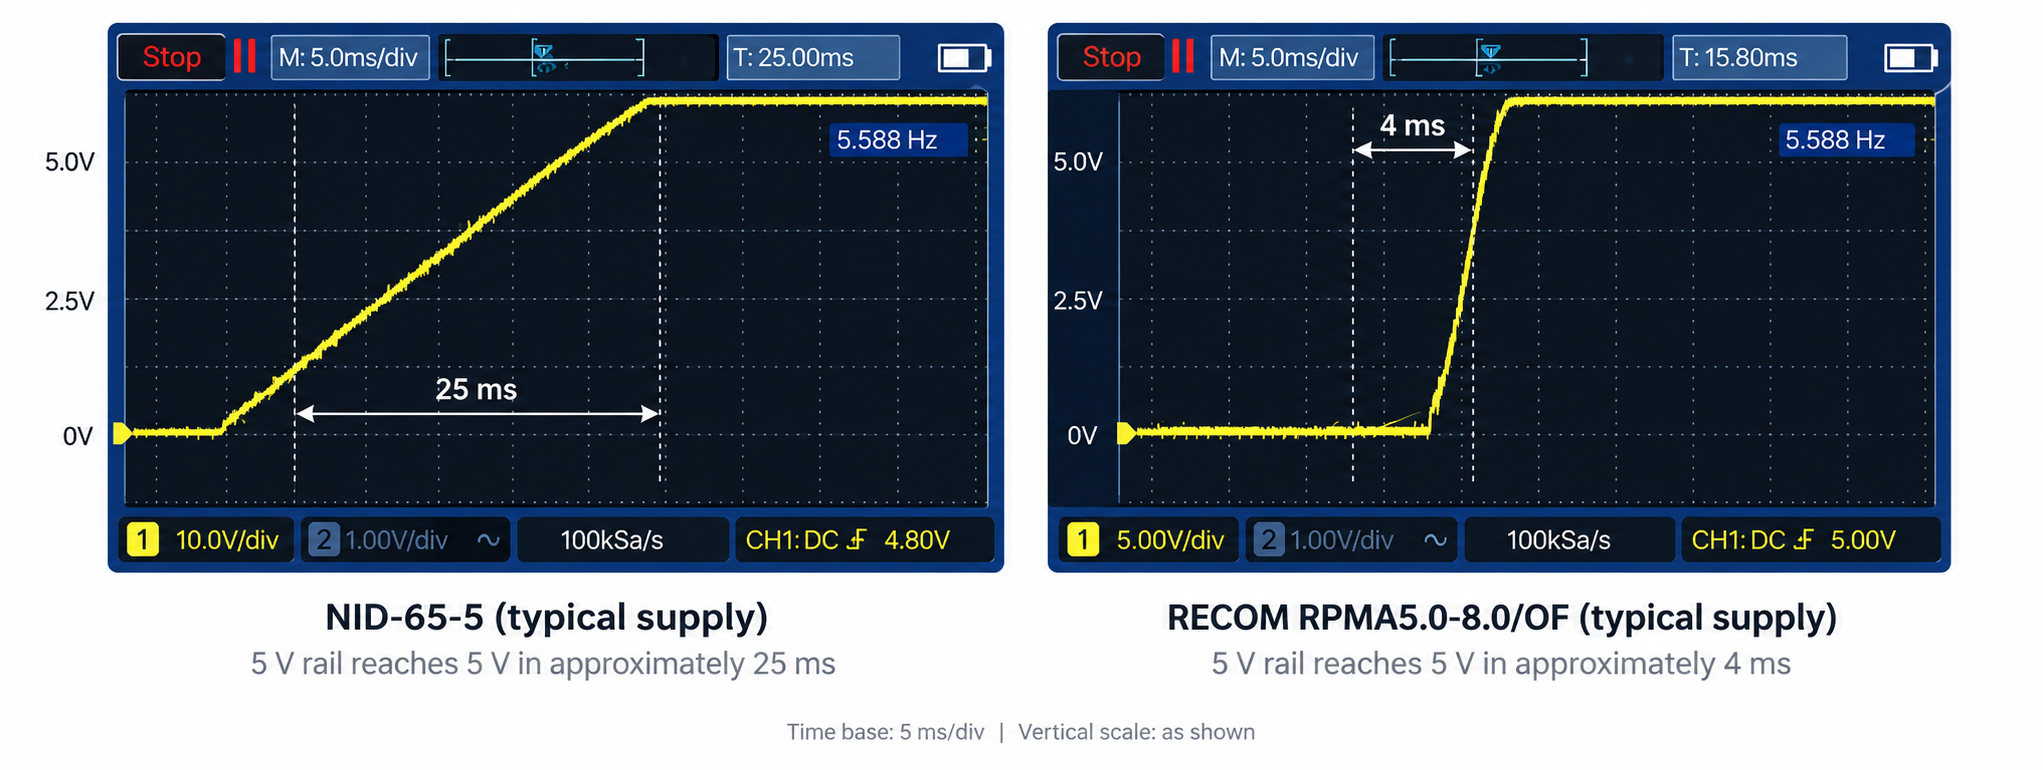
On our supply we measured approximately 25 ms for the output to rise towards its final 5 V level.
This sort of soft-start is normally a good thing.
It reduces inrush current and places less stress on both the converter and the equipment being powered.
The problem is that the Raspberry Pi 5's PMIC isn't particularly happy with a slowly rising 5 V rail when the Pi is being powered directly through its GPIO header.
Interestingly, the NID65 datasheet doesn't specify an output rise-time figure, despite providing fairly comprehensive specifications for the converter elsewhere. The 5 V NID65-5 is rated at 5 V / 6.5 A and 32.5 W.
This means it would be very easy to select the NID65 based purely on voltage and current specifications without ever considering its startup behaviour.
Why Pressing the Power Button Works
One clue was that after a failed startup, pressing the Raspberry Pi 5's power button caused it to boot normally.
By that point the NID65 had long since finished starting and there was a stable 5 V supply available.
The Pi therefore sees a completely different situation:
Power applied → slow 5 V ramp → PMIC enters standby
followed by:
Power button pressed → 5 V already stable → normal boot
This also explains why changing cables, increasing conductor size or fitting a larger DC/DC converter wouldn't necessarily solve the problem.
The issue isn't voltage drop under load.
It happens before the Raspberry Pi has really started drawing significant power.
How Fast Does the Supply Need to Be?
There doesn't appear to be an official Raspberry Pi specification simply saying that the 5 V rail must reach 5 V within a particular number of milliseconds.
Instead, the important area appears to be the time spent between roughly 3.5 V and 4.1 V.
Raspberry Pi engineers have confirmed that the PMIC's undervoltage lockout can be triggered by a slow rise through this region, although the exact debounce time isn't publicly specified.
There are also examples of Raspberry Pi 5 installations working correctly after their power supply soft-start was reduced to approximately 4 ms.
So rather than treating 5 ms as an absolute specification, I'd consider a supply reaching its operating voltage within only a few milliseconds to be a sensible target when powering a Pi 5 directly through the GPIO header.
Our approximately 25 ms NID65 startup was clearly slow enough to cause problems.
A Faster DC/DC Converter
One alternative we looked at was the RECOM RPMA5.0-8.0/OF.
This is another non-isolated DC/DC converter capable of converting a 24 V supply down to 5 V, with up to 8 A available at lower output voltages.
Unlike the NID65, RECOM actually specifies the startup characteristics.
The current RPMA-8.0/OF datasheet lists:
| Parameter | Typical |
|---|---|
| Start-up time | 11 ms |
| Rise time | 7 ms |
| Maximum output current below 6.5 V | 8 A |
In our own testing, we measured the 5 V output reaching its operating voltage in approximately 4 ms, considerably faster than the NID65-5.
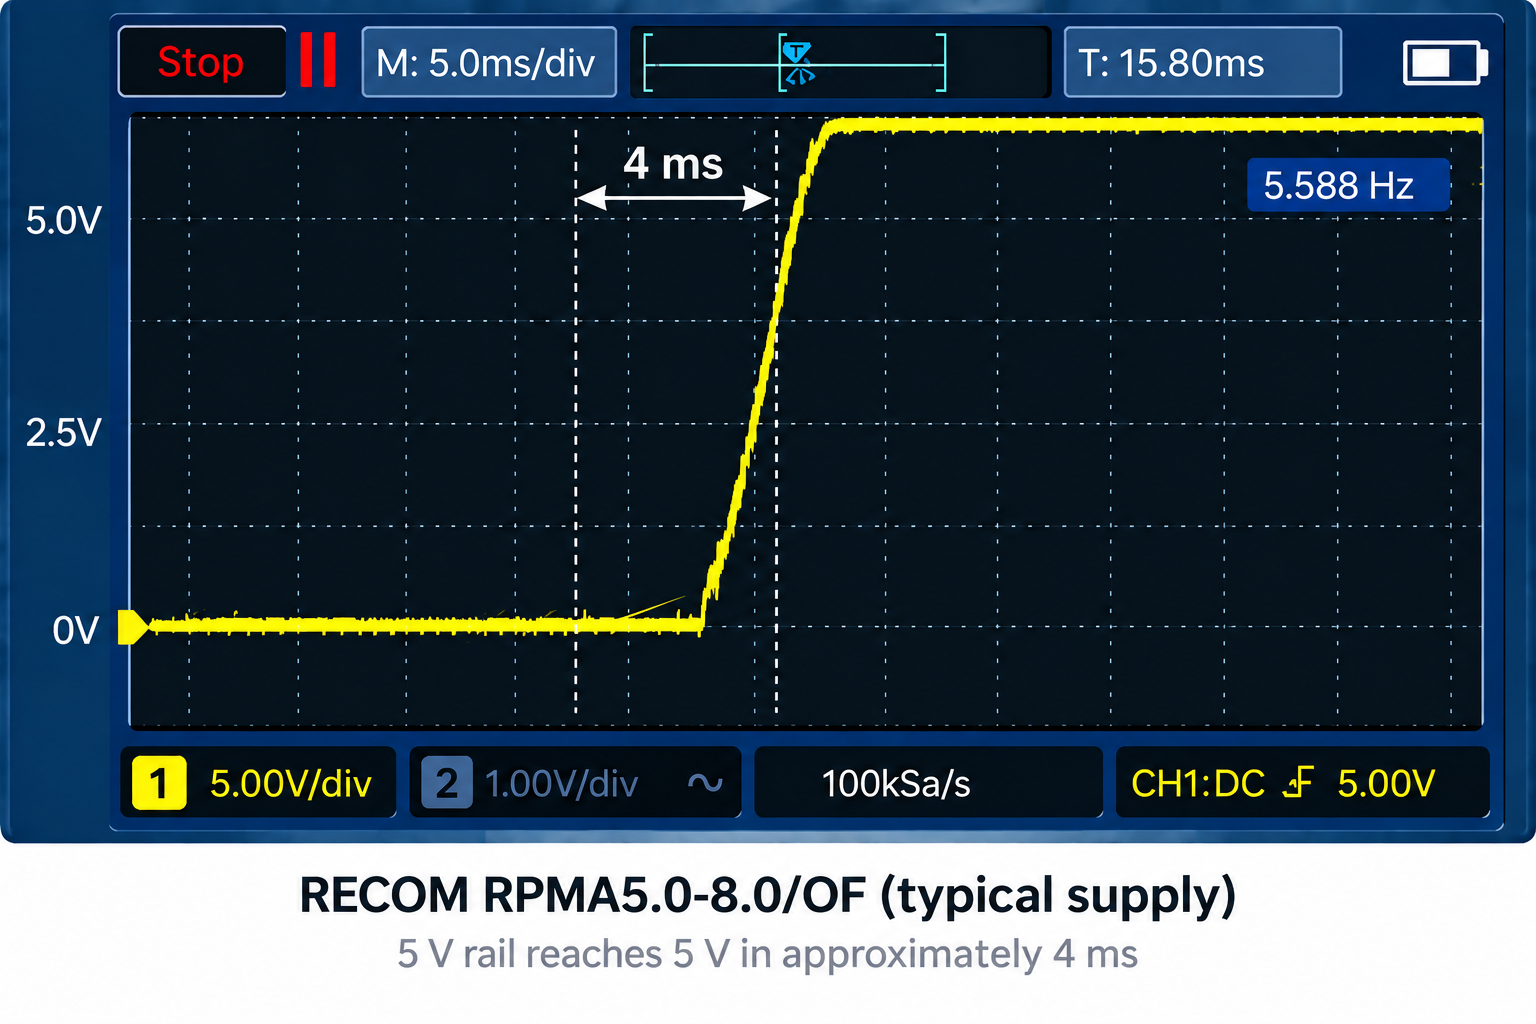
This makes it much better suited to directly powering the Raspberry Pi's GPIO 5 V rail.
The downside is cost.
The NID65 is an extremely economical converter, while the RECOM device is a considerably more expensive module.
For larger installations that price difference can quickly become significant.
Or Just Use USB-C
There is another solution which turned out to be surprisingly effective.
Instead of connecting our DC/DC converter directly to the Raspberry Pi's GPIO 5 V pins, we connected the 5 V output to a USB-C connector and powered the Pi through its normal USB-C input.
With exactly the same slowly rising supply, the Raspberry Pi booted correctly.
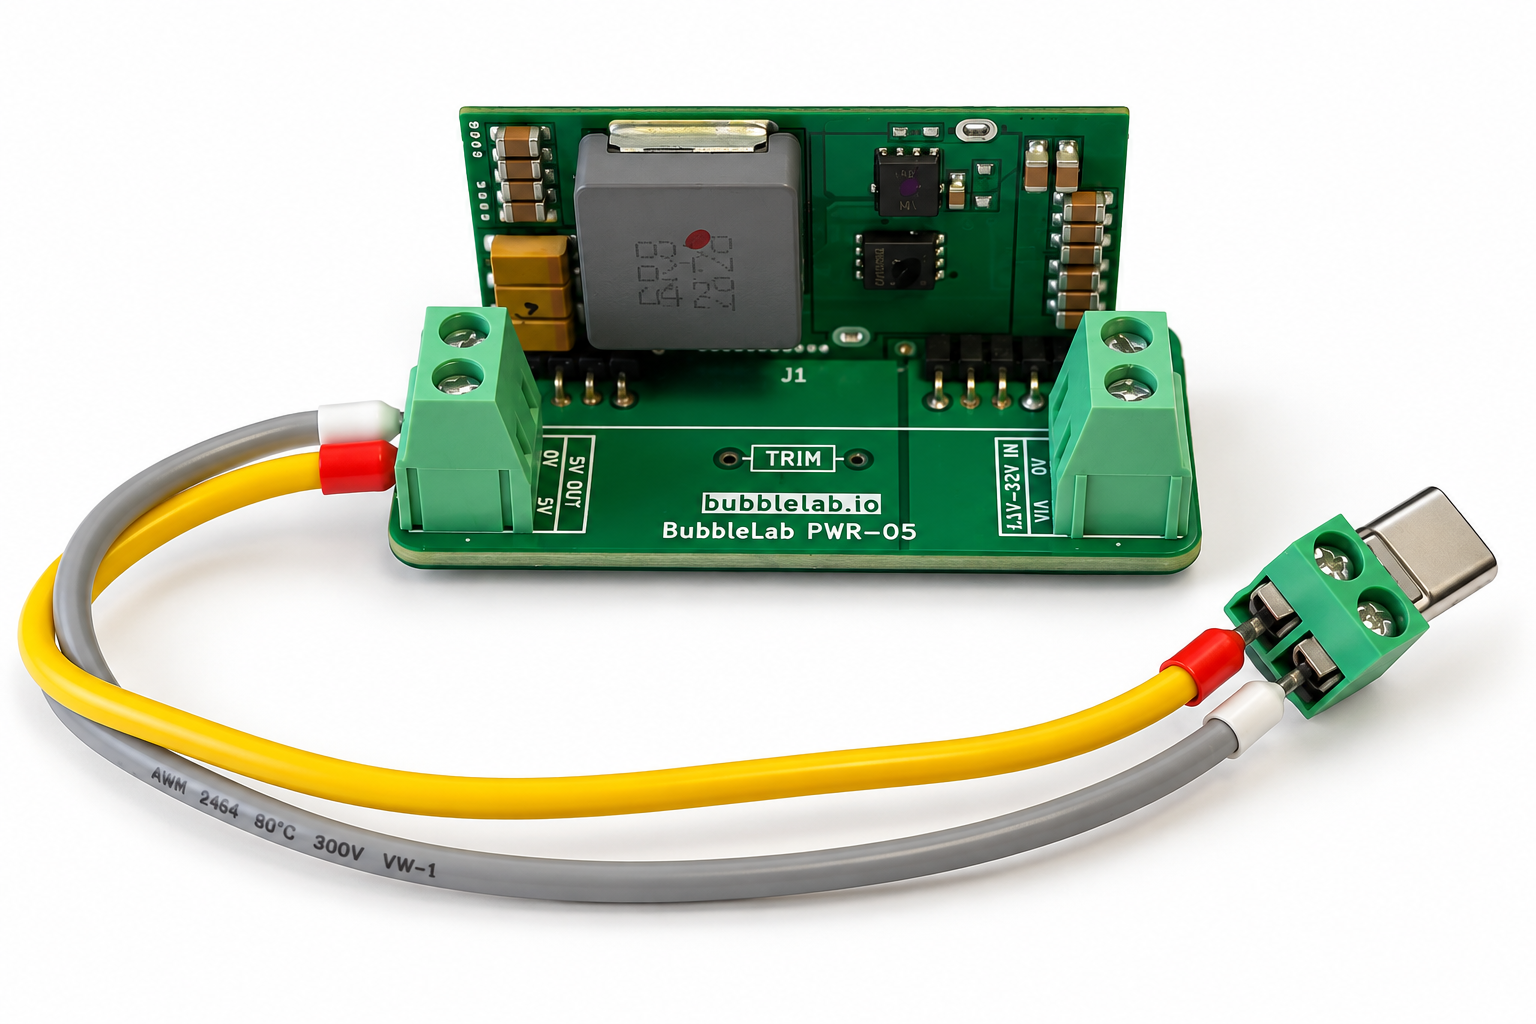
The reason is the additional circuitry on the Raspberry Pi's USB-C input.
The USB-C input includes overvoltage protection circuitry which initially isolates the internal power rail while the input circuitry starts. One side effect is that the Raspberry Pi is much more tolerant of a slowly rising external supply than it is when 5 V is fed directly into the GPIO header.
This is actually a very useful option for industrial Raspberry Pi installations.
You don't necessarily need a USB Power Delivery power supply.
A normal regulated 5 V DC/DC converter can be connected to an appropriately wired USB-C connector, allowing the Raspberry Pi to benefit from its onboard input protection circuitry.
There are obviously still some important considerations around current capability, connector rating, cable resistance and USB-C configuration, but electrically this can make a slowly starting industrial DC/DC converter much easier to use with a Raspberry Pi 5.
GPIO vs USB-C Power
The difference can be simplified to something like this:
Powering through GPIO
24 V → DC/DC → slow 5 V ramp → Raspberry Pi PMIC
The Raspberry Pi sees the entire startup ramp.
Powering through USB-C
24 V → DC/DC → slow 5 V ramp → USB-C input protection → Raspberry Pi PMIC
The additional input circuitry prevents the PMIC from seeing quite the same slow-ramp condition.
This is why the exact same converter can behave differently depending on where you connect it.
Which Solution Did We Choose?
For our project the NID65-5 still had a lot going for it.
It's compact, efficient, inexpensive and provides more than enough current for our Raspberry Pi 5, touchscreen and associated electronics.
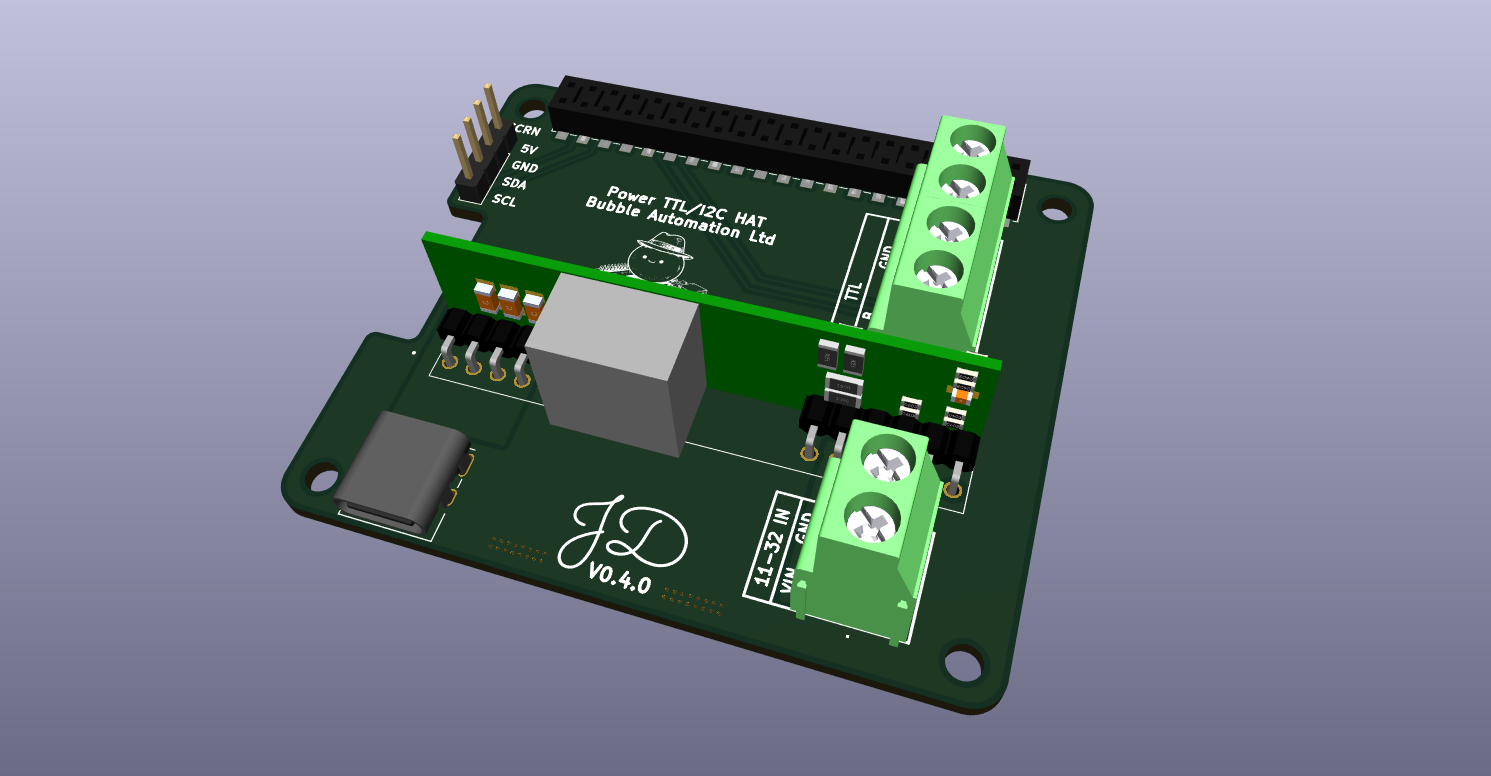
We had also already designed a dedicated carrier PCB around it.
Replacing every converter with a significantly more expensive module purely because of its startup time didn't seem particularly sensible.
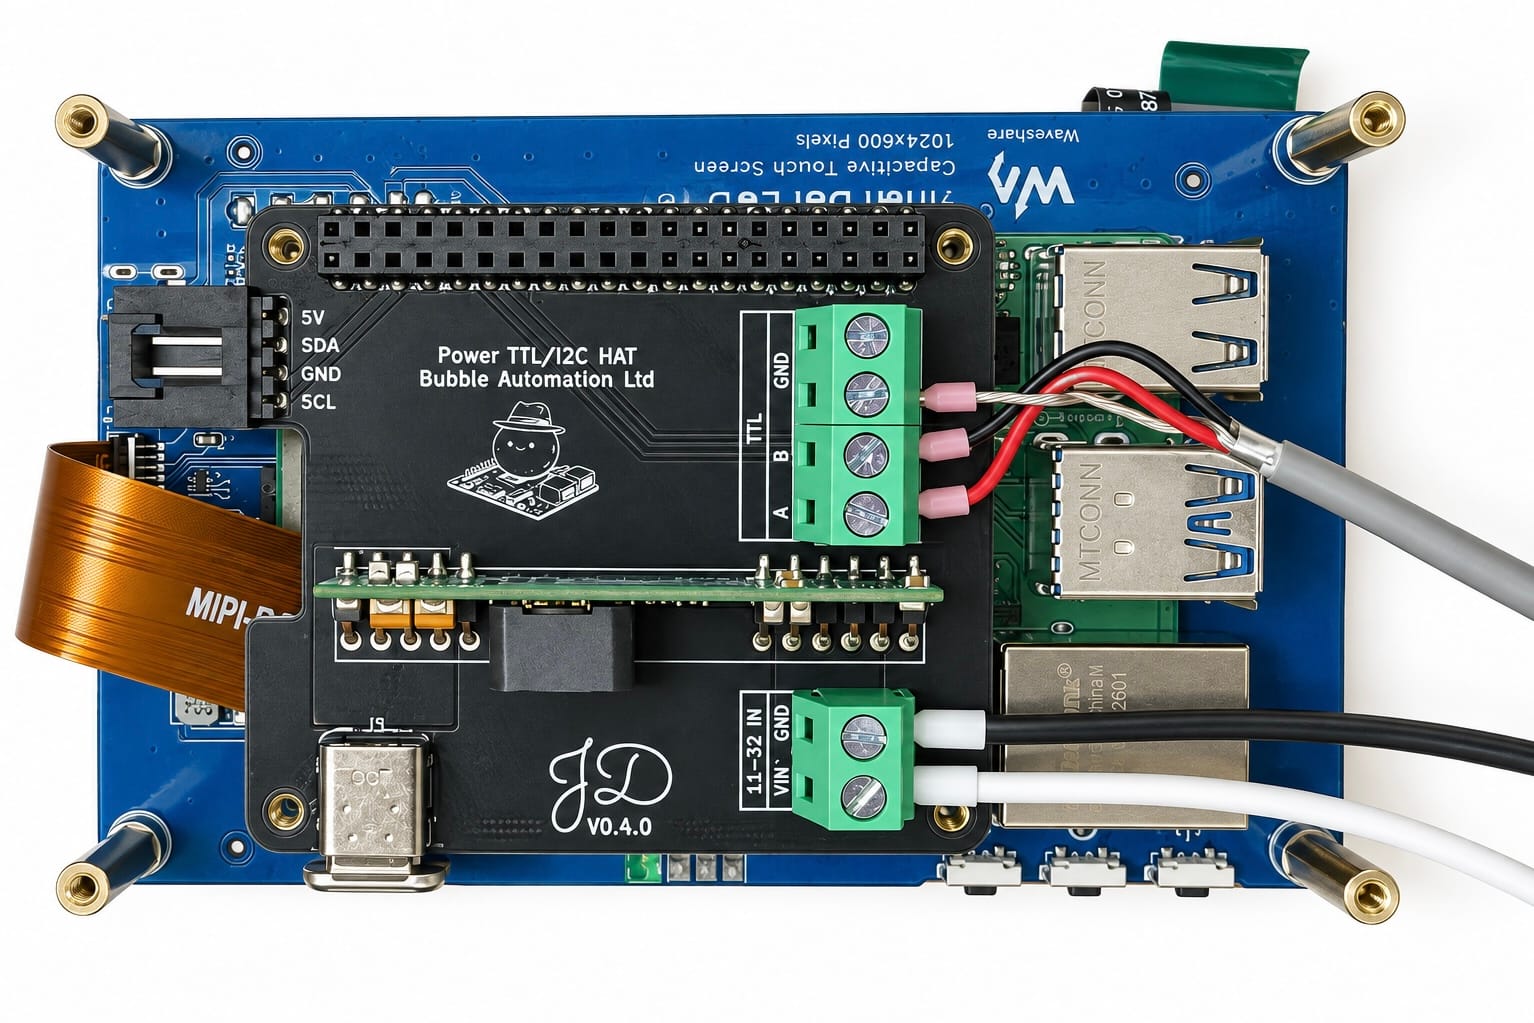
Instead, supplying the Raspberry Pi through its USB-C input gave us the best of both worlds.
We could continue using the NID65 while allowing the Raspberry Pi's own input circuitry to deal with the slower power supply startup.
A Slightly Unexpected Lesson
When designing power electronics it's very easy to concentrate on the obvious specifications:
- Input voltage
- Output voltage
- Maximum current
- Ripple
- Efficiency
- Voltage regulation
Before this project I probably wouldn't have given much thought to the difference between a 5 ms and 25 ms startup time for a simple 5 V supply.
Both eventually produce exactly the same 5 V.
But to the Raspberry Pi 5, how the supply gets there can be just as important as the final voltage.
It also demonstrates one of the disadvantages of powering a Raspberry Pi directly through its GPIO header.
Although electrically simple, it bypasses some of the protection and power-input circuitry provided on the USB-C connection.
If you're designing a Raspberry Pi 5 into a product and find that it occasionally refuses to boot from an otherwise perfectly good 5 V supply, it's worth putting an oscilloscope on the rail before replacing the power supply.
The problem might not be how much power it can provide.
It might simply be taking too long to get there.
Conclusion
Our NID65-5 was perfectly capable of supplying the Raspberry Pi once running, but its approximately 25 ms startup ramp could occasionally cause the Raspberry Pi 5 PMIC to enter standby when powered directly through the GPIO header.
A faster converter such as the RECOM RPMA5.0-8.0/OF is one possible solution.
Alternatively, powering the Raspberry Pi through its USB-C input allows its onboard input circuitry to make the system considerably more tolerant of a slowly rising 5 V supply.
For us, USB-C turned out to be the simplest solution.
And it's a good reminder that when powering modern electronics, 5 V isn't always just 5 V.


Comments ()