TerraMaster install NextCloud on FreeNAS
In this post I'll guide you through installing & optimising NextCloud on Intel based Terra Maters NAS's running TrueNAS 12, in this example I'm using a F2-221 with 10GB of RAM.
If your TerraMaster NAS isn't already running TrueNAS you can find my guide below that will follow you through upgrading your hardware and installing TrueNAS 12.

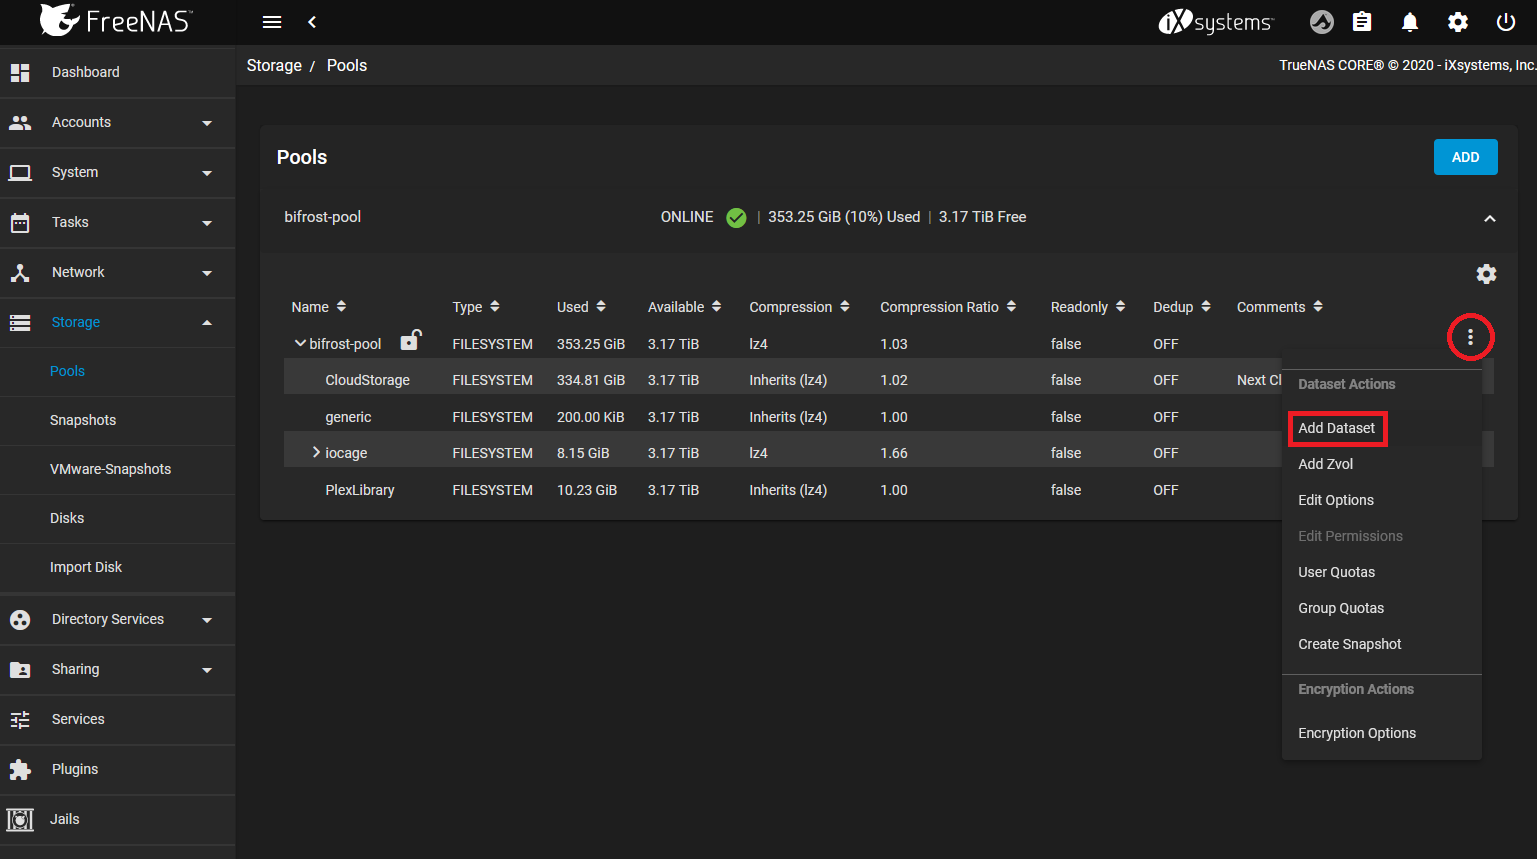
Dataset
Create Dataset
Start by creating a new dataset from Storage -> Pools, select the three dots on your pool then click Add Dataset.
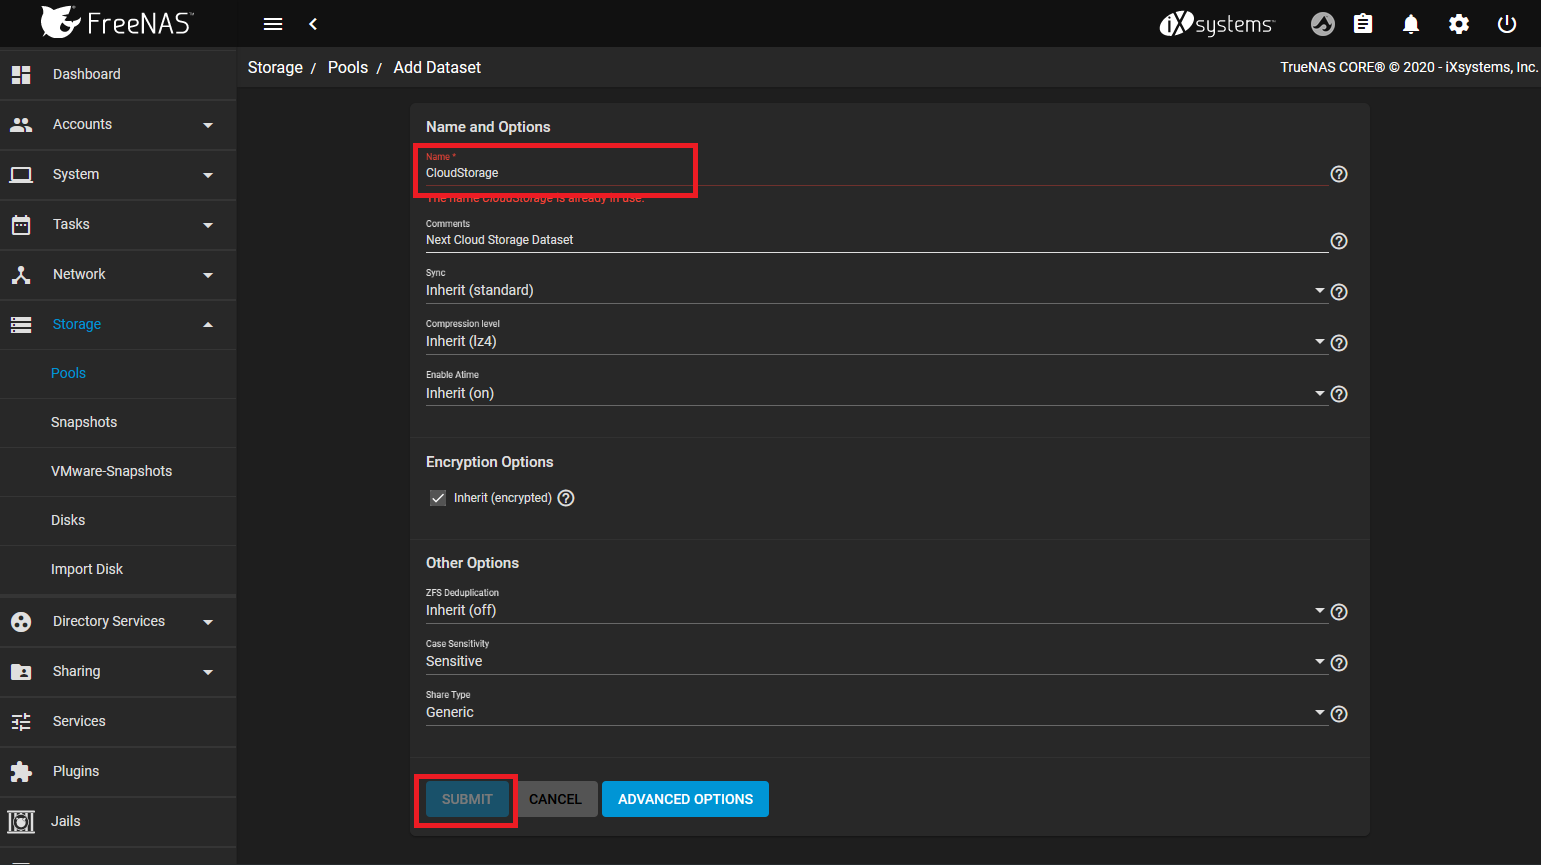
Give your dataset a name, mine is called CloudStorage remember to set this to yours in other steps! Check the default settings match the ones below then Submit to save.
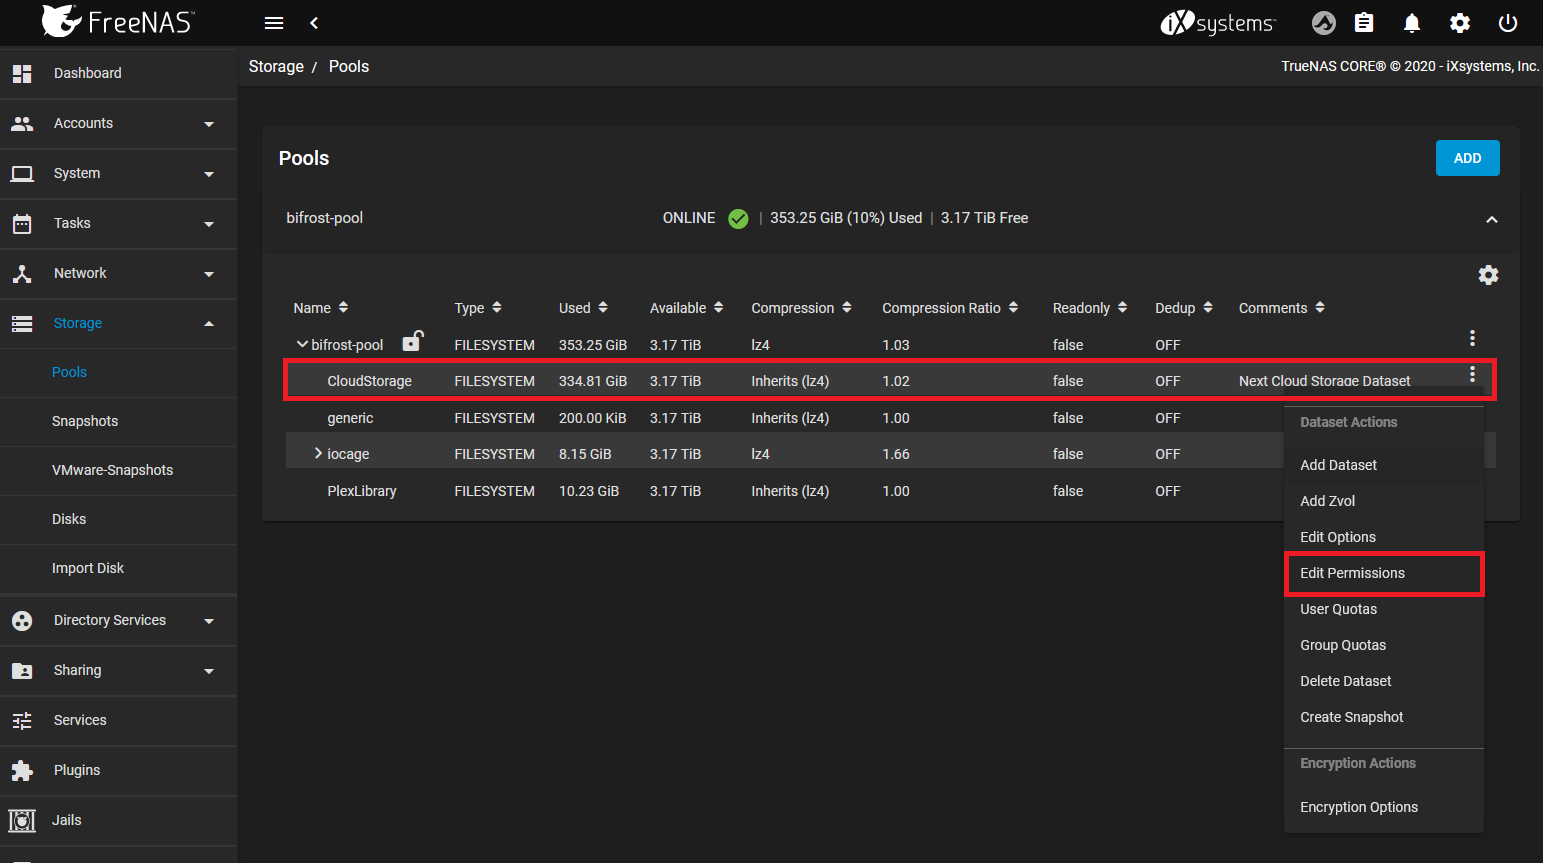
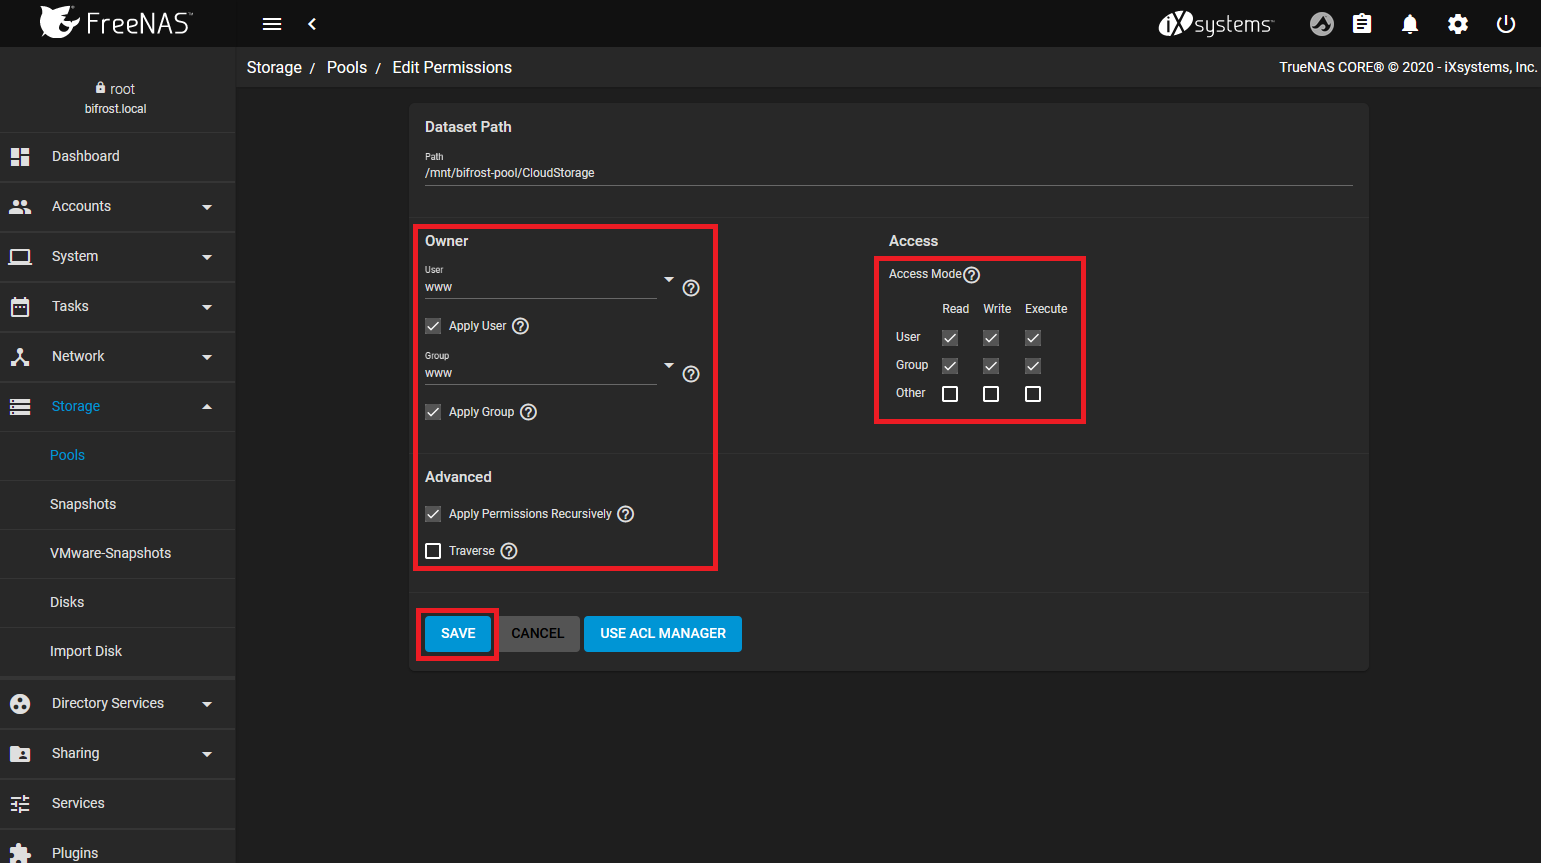
Set Permissions
From the three dots on your newly created dataset select Edit Permissions.
Set User & Group to www, tick Apply User, Apply Group & Apply Permissions Recursively. Confirm Access Mode matches the below then click save.
Install NextCloud
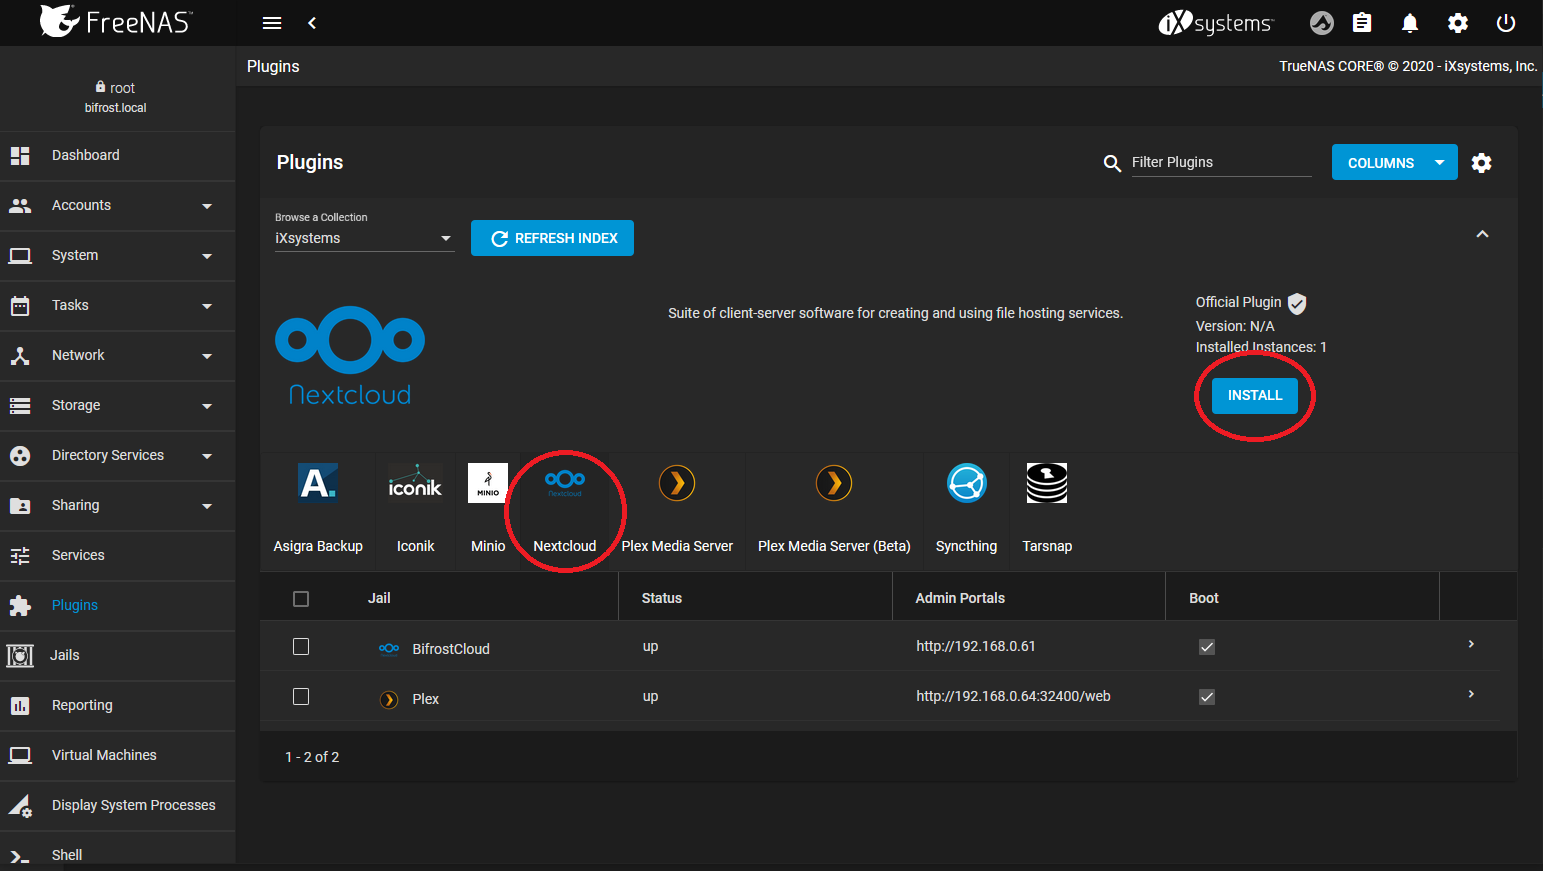
Install Plugin
From the left-hand menu select Plugins, NextCloud then INSTALL.
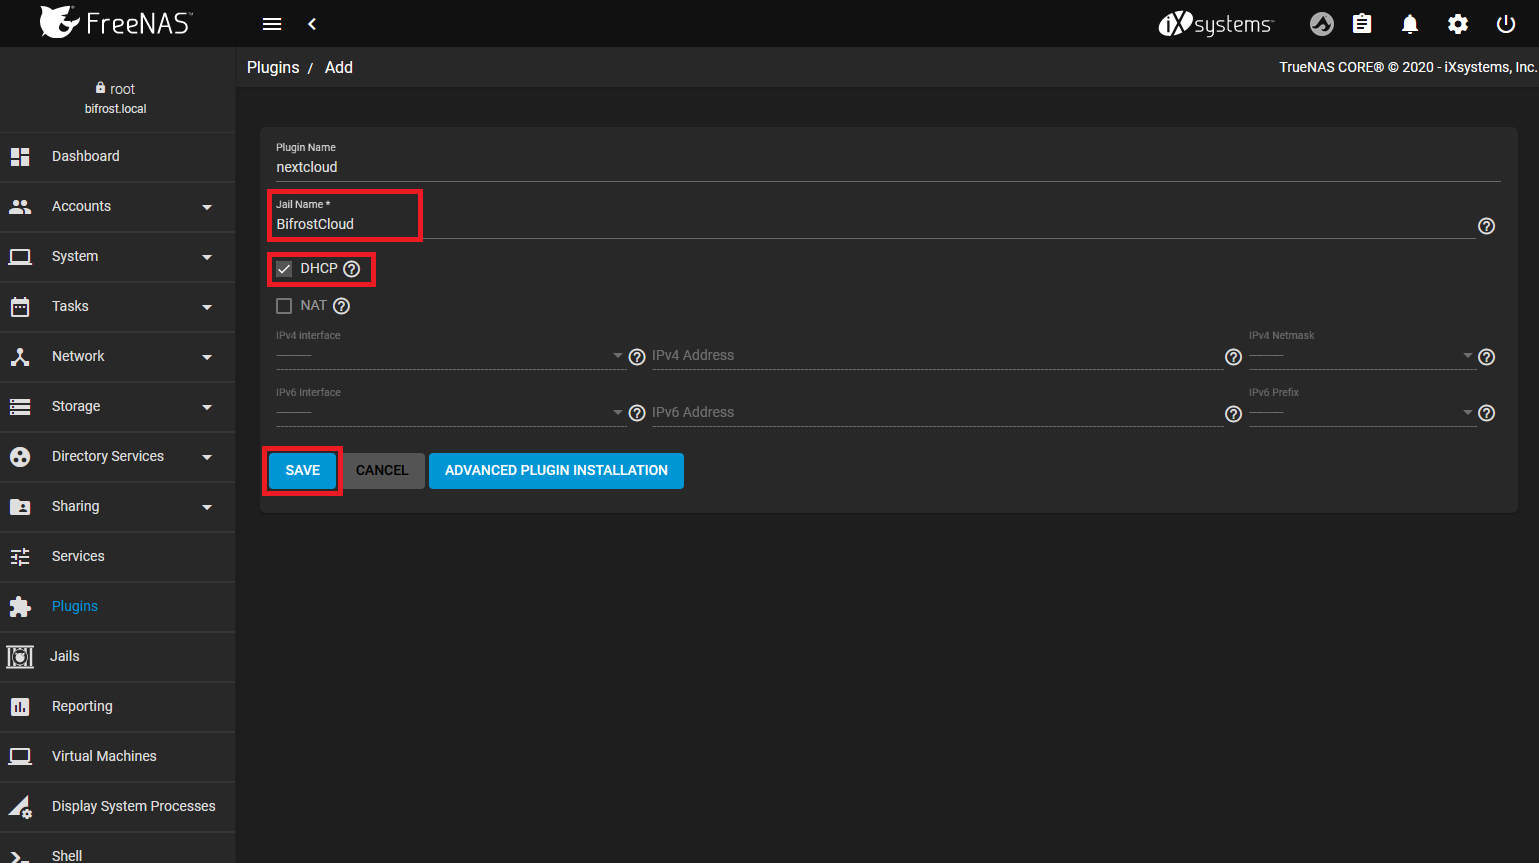
Name your Jail, I've called mine BifrostCloud remember to change this to yours in later steps, change NAT to DHCP to allow your router to set the new Jails IP Address. Use your router to assign the address permanently.
Attach Dataset
Copy NextCloud data directory to your new Dataset
Don't run these commands from your jail
cp -r /mnt/bifrost-pool/iocage/jails/BifrostCloud/root/usr/local/www/nextcloud/data/ /mnt/bifrost-pool/CloudStorage/Delete NextCloud data folder
rm -r /mnt/bifrost-pool/iocage/jails/BifrostCloud/root/usr/local/www/nextcloud/dataSet Permissions
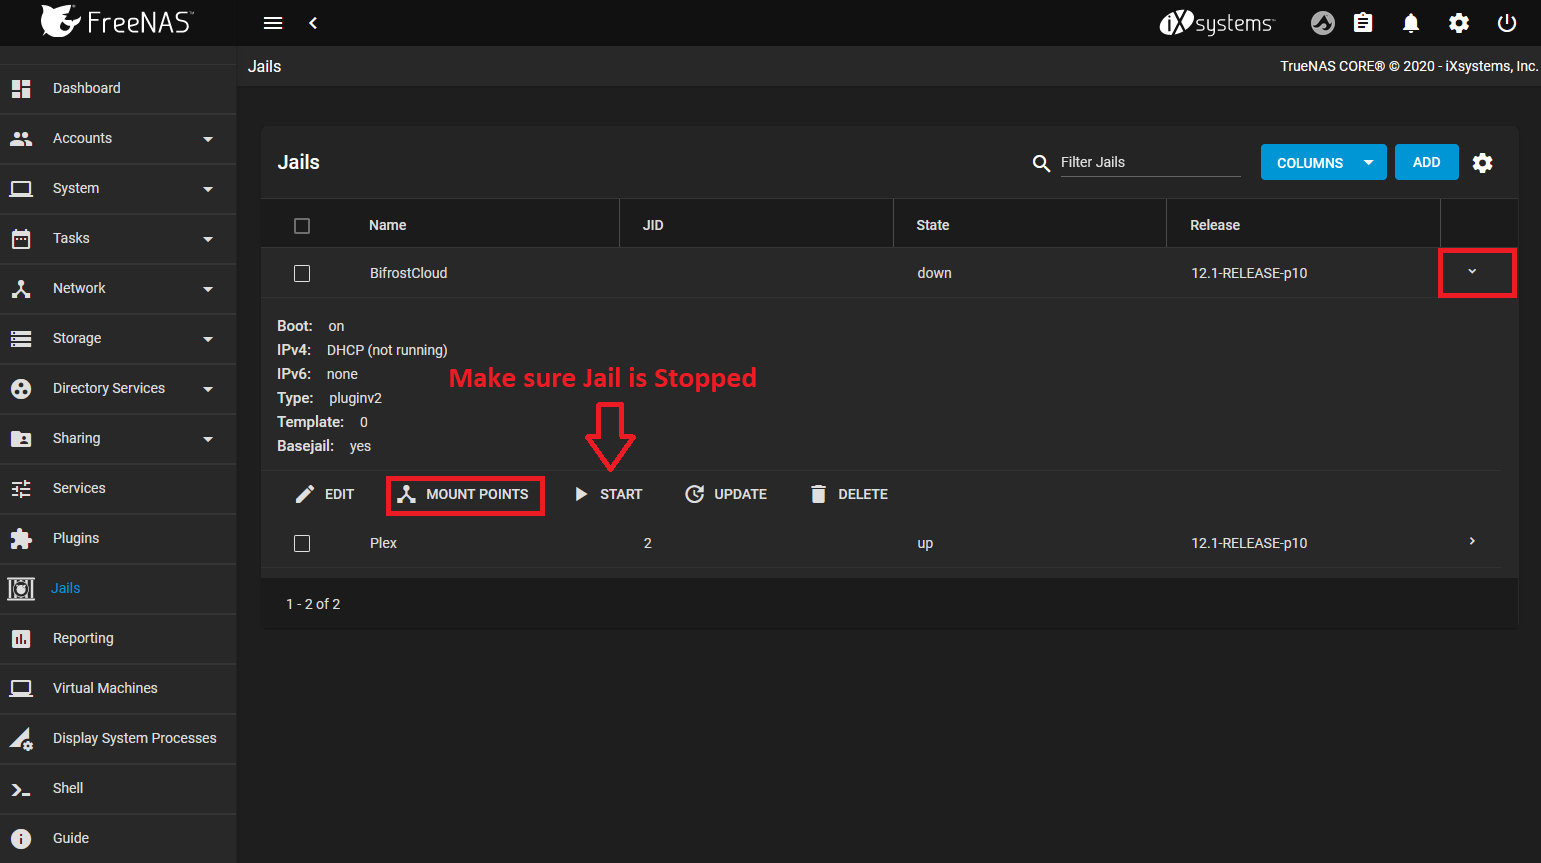
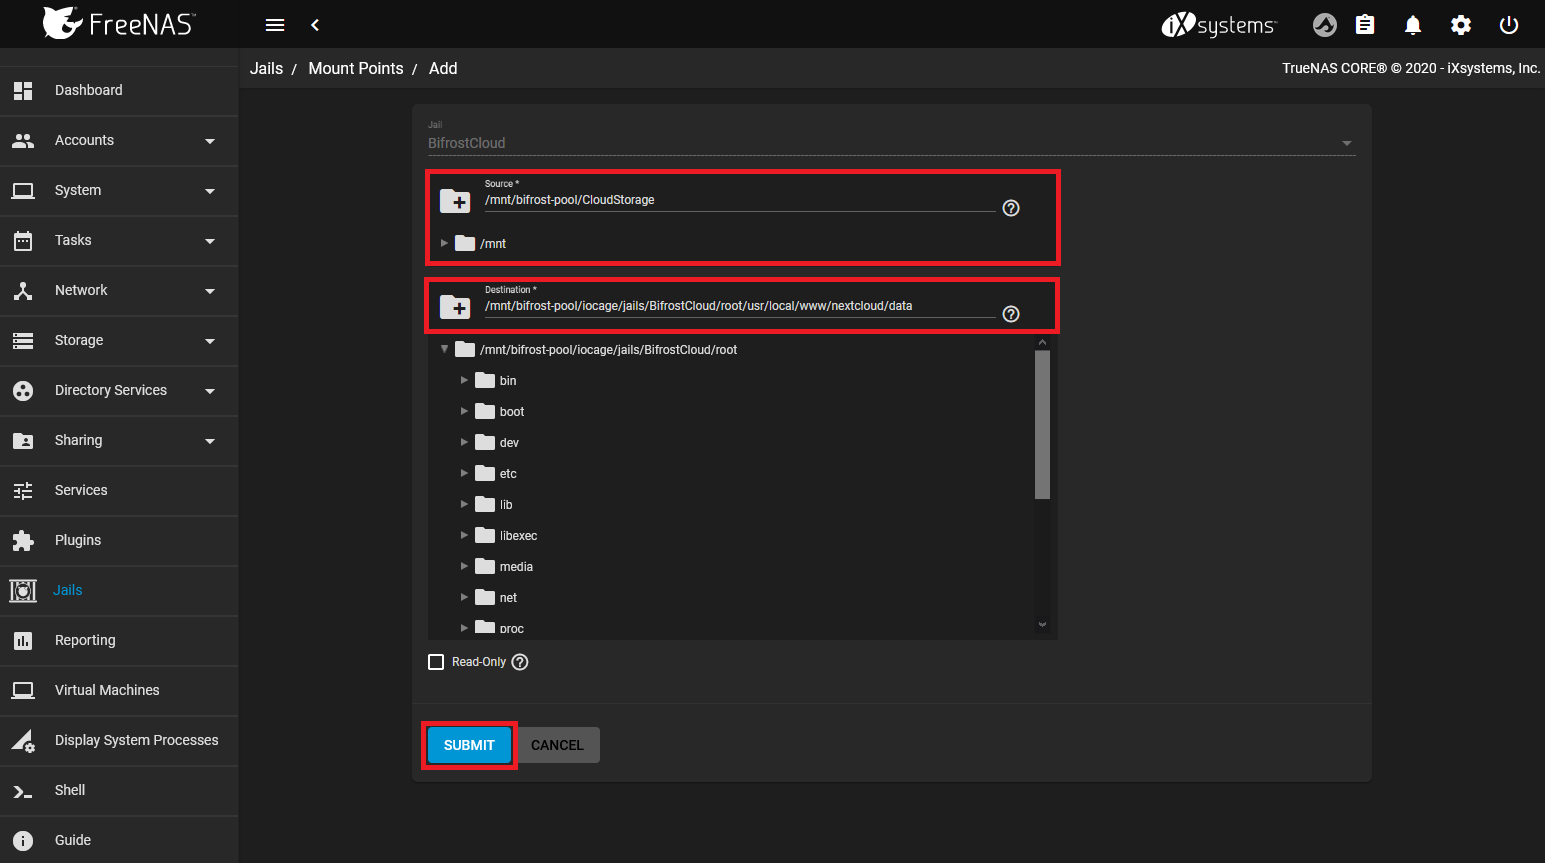
chown -R www:www /mnt/bifrost-pool/CloudStorage/From the Jail page stop your NextCloud instance then select MOUNT POINTS
Go to ACTIONS then Add
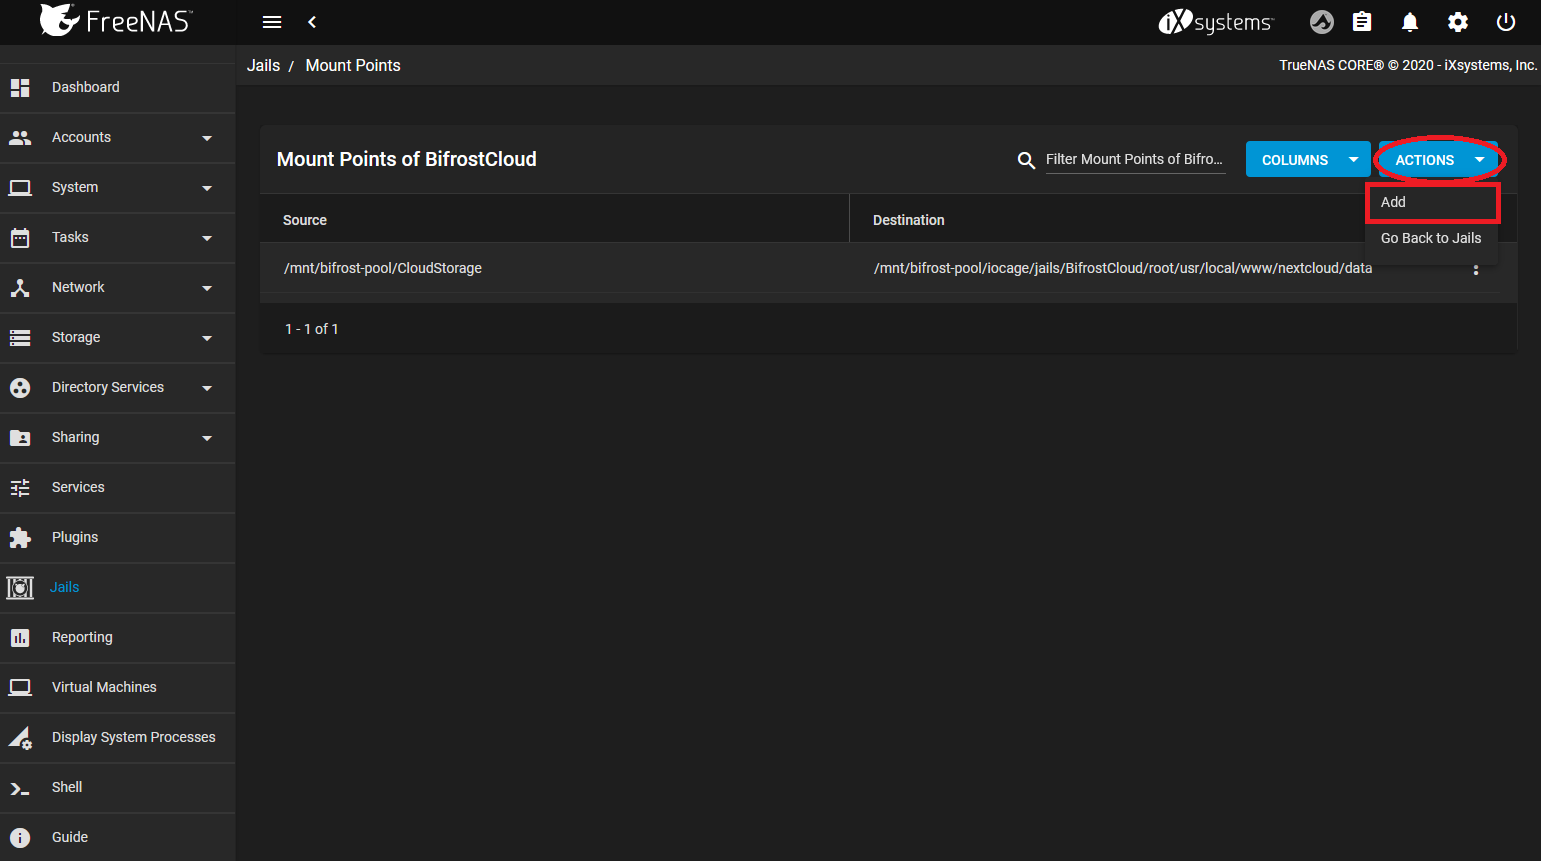
Now use the source/destination path as seen below except modified to fit your installation.
Configure NextCloud
Add Trusted Domains
Add your assigned IP Address & Domain Name to Trusted Domains.
nano /mnt/bifrost-pool/iocage/jails/BifrostCloud/root/usr/local/www/nextcloud/config/config.php 'trusted_domains' =>
array (
0 => 'localhost',
1 => '192.168.0.61',
2 => 'cloud.joelduncan.io',
),Setup SSL
Copy SSL pem & key files to the following directory
/mnt/bifrost-pool/iocage/jails/BifrostCloud/root/etc/ssl/Add the following to the NextCloud Nginx configuration
nano /mnt/bifrost-pool/iocage/jails/BifrostCloud/root/usr/local/etc/nginx/conf.d/nextcloud.conf ssl on;
ssl_certificate /etc/nginx/ssl/joelduncan-io-certificate.pem;
ssl_certificate_key /etc/nginx/ssl/joelduncan-io-key.pem;
ssl_session_timeout 5m;
ssl_ciphers 'AES128+EECDH:AES128+EDH:!aNULL';
ssl_protocols TLSv1 TLSv1.1 TLSv1.2;
ssl_prefer_server_ciphers on;Restart Nginx from the Jail Shell
sudo service nginx restart
sudo service nginx reload
Optimise PHP-FPM
Run these commands outside your jail
Tweak your PHP-FPM configuration
nano /mnt/bifrost-pool/iocage/jails/BifrostCloud/root/usr/local/etc/php-fpm.d/nextcloud.confAdd/Modify to match below
pm = dynamic
pm.max_children = 64
pm.start_servers = 16
pm.min_spare_servers = 16
pm.max_spare_servers = 32
Correct aliases
nano /mnt/bifrost-pool/iocage/jails/BifrostCloud/root/usr/local/etc/nginx/conf.d/www.confUncomment the below existing entries.
;env[HOSTNAME] = $HOSTNAME
;env[PATH] = /usr/local/bin:/usr/bin:/bin
;env[TMP] = /tmp
;env[TMPDIR] = /tmp
;env[TEMP] = /tmp
Restart PHP-FPM from inside the jail
sudo service php-fpm restartSetup Complete
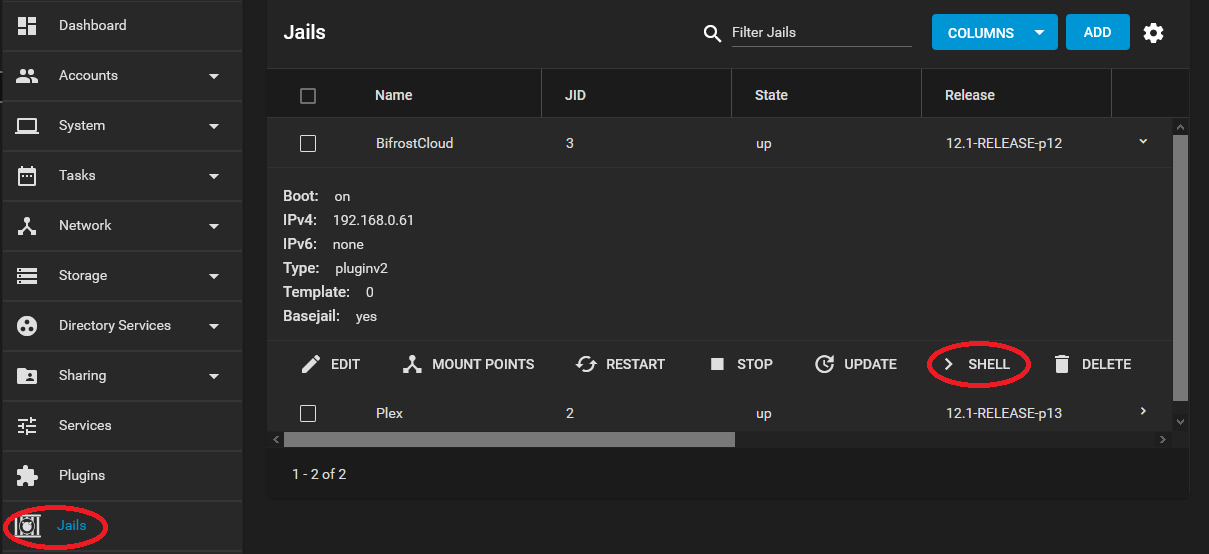
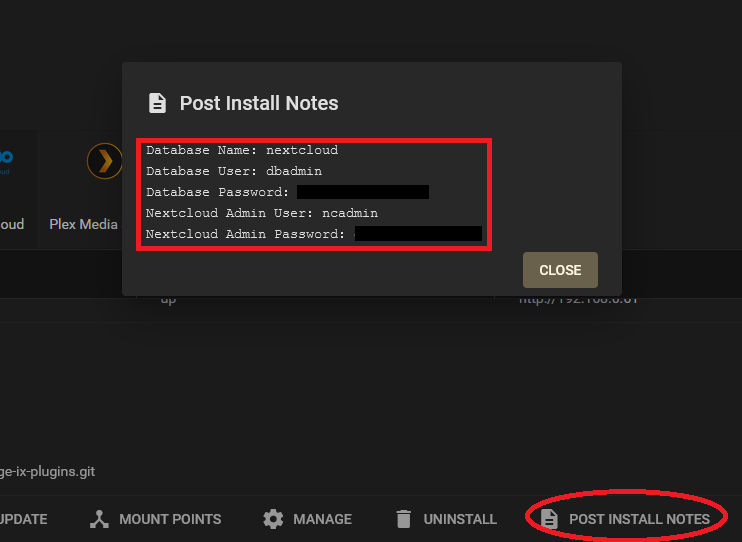
Everything is ready to go but before accessing your instance by its IP or domain you will need the MySQL and NextCloud credentials created by the plugin, you can find them in the POST INSTALL NOTES
Plugins -> NextCloud -> Drop Down -> POST INSTALL NOTES
Update NextCloud
Must be done from the Jail
php74-phar is required and can be installed with the following command
pkg install sudo php74-pharThen the following to perform a update
sudo -u www php /usr/local/www/nextcloud/updater/updater.pharMisc
Run OCC Commands
Must be done from the Jail
From your NextCloud installation directory
su -m www -c 'php ./occ maintenance:mode --off'


Comments ()